Sixty-eight years. That's how long the production line at Solihull ran before the last classic Defender, a soft-top 90 wearing the registration H166 HUE, rolled off at 9:22 on the morning of January 29, 2016[1]. More than two million had been built since 1948[1]. And now, not a single new one will ever come again.

Every year the remaining pool of unrestored classic Defenders shrinks. Corrosion takes some. Neglect takes more. The ones that survive fall into two camps: those rotting under tarps behind someone's barn, and those fortunate enough to land on a rotisserie in a proper shop. The Monarch Defender restoration process is what separates the second group from the first. Done well, it doesn't just save a truck. It makes one that's better than anything that ever left Solihull.
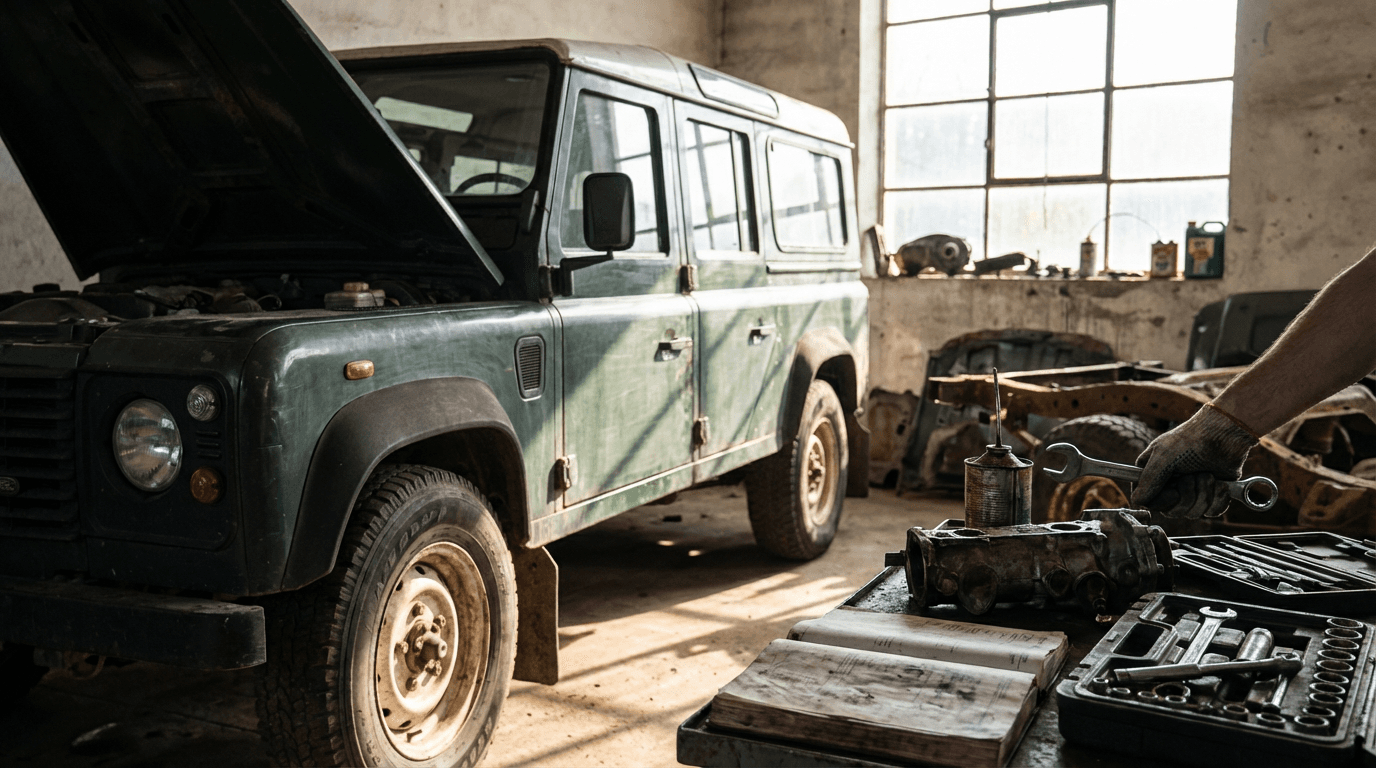
I've personally overseen more than 150 ground-up Defender builds. I've seen what works, what fails, and what corners shops cut when they think nobody's paying attention. Here is a breakdown of our exact 12-stage build process.
| Phase | Description | Timeline |
|---|---|---|
| 1. Sourcing & Teardown | Verifying NAS/25-year donors and complete bare-metal disassembly. | 2-4 Weeks |
| 2. Chassis & Body | Hot-dip galvanizing frame, panel repair, and multi-layer Standox paint. | 8-12 Weeks |
| 3. Powertrain & Running Gear | GM LS3/LT1 V8 integration, heavy-duty suspension, and big brake kits. | 6-8 Weeks |
| 4. Interior & Electrical | Custom wiring harness, Italian leather upholstery, and modern tech. | 6-10 Weeks |
| 5. Testing & Delivery | 200-mile shakedown, build dossier documentation, and final detailing. | 2-4 Weeks |
Jump to a Restoration Stage:
- Stages 1 & 2: Sourcing & Disassembly
- Stage 3: Chassis Restoration
- Stages 4 & 5: Body & Paint
- Stages 6 & 7: Electrical & Insulation
- Stages 8 & 9: Bespoke Interior
- Stage 10: Powertrain Upgrades
- Stages 11 & 12: Testing & Delivery
- Cost Breakdown
Stage 1 & 2: Donor Sourcing and Complete Disassembly
Glamorous? No. But the single most important decision in any Defender restoration process is which vehicle you start with. We source our own chassis specifically because we refuse to inherit someone else's mistakes. Finding a clean-title NAS (North American Specification) Defender or a verified 25-year import gets harder every year.
The restoration cannot begin in earnest until the vehicle is reduced to its fundamental components. Every bolt gets removed. Every wire gets pulled. A Defender that looked "solid" in photographs often reveals serious corrosion once the interior is stripped. If you skip the full strip-down, you are building on a foundation you don't understand.
Monarch Standard: We almost never accept a client-provided vehicle for restoration. Every Monarch build begins with a donor we've sourced, inspected, and approved ourselves. That's how we control quality from minute one.
Stage 3: Defender Chassis Restoration & Hot-Dip Galvanizing
The chassis is where most Defender restorations succeed or fail. The original frames were bare steel. Where the aluminum body panels contact steel in the presence of moisture, the aluminum corrodes preferentially.
At Monarch, every chassis goes through a multi-step renewal:
- Shot-blasting to bare metal, removing every trace of old paint and corrosion.
- Hot-dip galvanizing in molten zinc at approximately 450°C.
- Epoxy primer and wax-oil injection into every closed cavity.
Unlike paint, hot-dip galvanizing creates a metallurgical bond with the steel. If someone is selling you a "fully restored" Defender and the chassis wasn't galvanized, they sold you a ticking clock.
Stage 4 & 5: Aluminum Body Restoration and Premium Paint
We strip every aluminum body panel to bare metal, assess it for damage, and repair or replace it. Paint preparation is where shortcuts destroy builds. We build up the system properly and finish in premium Standox automotive paint. Between the aluminum body and the galvanized steel frame, we install isolation gaskets to prevent future galvanic corrosion.
Stage 6 & 7: Modern Electrical & Thermal Insulation
I have a confession. The original 30-year-old Lucas wiring is atrocious. Every Monarch build receives a brand-new, modern wiring harness designed for the specific high-amperage equipment in that build. Before the interior goes in, high-performance thermal and acoustic insulation is layered throughout the cabin to eliminate road noise and regulate temperature.
Stage 8 & 9: Bespoke Interior Craftsmanship and Custom Accessories
The stock interior was hose-down practical, but not remotely comfortable for highway driving. This is where your vehicle becomes truly bespoke. Hand-stitched Italian leather covers the seats and dashboard. We integrate modern climate control, custom LED lighting, and functional exterior accessories like custom wheels and winches to match your exact specifications.
Stage 10: Powertrain Upgrades: The LS3/LT1 Defender Swap
While the original 111-horsepower diesel engine has an analog charm, it is genuinely harrowing on a modern interstate. Our builds utilize modern GM LS3 or LT1 V8 engines, delivering 430 to 460 horsepower through a 6L80E 6-speed automatic transmission.
The integration requires custom adapter plates machined to 0.002" tolerance, custom headers, and uprated transfer cases. To handle this power, we fit progressive-rate coil springs, heavy-duty adjustable dampers, and Wilwood four-wheel ventilated disc brakes.
Check out our comparison of the best land rover defender engine!
Stage 11 & 12: Modern Tech, Rigorous Testing, and Delivery
We seamlessly embed modern technology, like Alpine touchscreens with Apple CarPlay and wireless charging, while preserving the classic Defender look. But the process isn't complete when the last bolt is tightened.
Every Monarch build goes through an extended 200-mile shakedown protocol. Every stage of the build is photographed, and every torque specification is recorded in a build dossier that stays with the vehicle for life.

What a Proper Defender Restoration Process Actually Costs
I won't dance around this. A genuine ground-up Defender build, the kind where every component is addressed and the result is better than new, is not inexpensive. Professional frame-off restorations with modern drivetrain integration run between $150,000 and $300,000+, depending on specification. Timeline is typically 8 to 14 months.
- Donor Procurement & Teardown: 10-15% of total cost
- Chassis Galvanizing & Suspension: 15-20% of total cost
- Modern V8 Powertrain Integration: 25-30% of total cost
- Bodywork & Premium Paint: 20-25% of total cost
- Bespoke Interior & Electrical: 15-20% of total cost
Is that a lot of money? It is. Is it proportional to the work involved? Also yes. Consider what you're getting: a vehicle built from the frame up with a galvanized chassis designed to last half a century, a modern V8 producing more than four times the original horsepower, upgraded brakes, suspension, and steering, a hand-crafted interior, premium paint, complete new electrics, and documentation covering every stage. You're also getting something no amount of money can buy new: the silhouette. That shape. The one that 2,016,933 vehicles carried out of Solihull between 1948 and 2016[1].
No one is making more of them.
Commencing Your Commission
The Defender restoration process, done properly, is an act of preservation and engineering in equal measure. It takes the right donor, the right team, and the willingness to do every step correctly rather than quickly. At Monarch, our 13-stage ground-up build process exists because we've learned, across 150+ commissions, that there are no shortcuts worth taking. Start your commission today and speak with our build team about what your Defender should be.